
The basic purpose of a form is to collect information from users with a specific goal in mind. It has been an essential part of every inbound marketing and data collection which can eventually be used for conversion from regular website visitors to potential customers or clients.
Back in time, a single form is the norm of every website and landing pages. But as more and more fields of information are required to fill up, it’s easy for users or website visitors to get overwhelmed when they see a long-form which sometimes causes them to abandon the form page.
Today, multi-step forms have become more and more popular on websites and landing pages which partially eliminates this problem by collecting information piece by piece in steps without intimidating users. You can check the form demo here.
A multi-step form is simply a long-form of fields of information broken down into multiple pieces or series of steps to avoid unnecessary intimidation to complete the form. The user can only see parts of the fields that are needed to fill up for that particular step and then later on as the next button is clicked, it will show more data fields to fill up. In addition, users can also go back to the previous set of fields they already filled up by clicking on the previous button. By allowing users to complete the fields in smaller chunks, creates a positive user experience and increase in conversion.
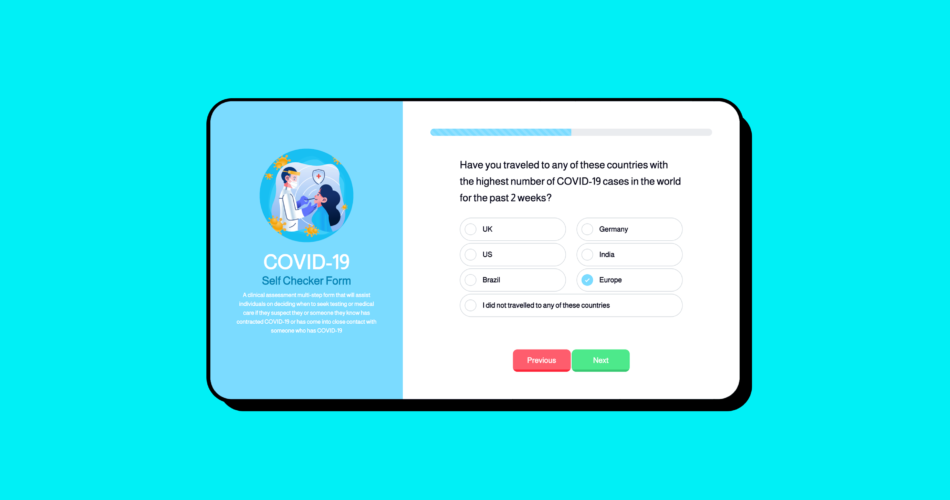
In today’s tutorial, I am going to show you how you can use Bootstrap 5 and JavaScript to create a multi-step form app. To be precise, we’re going to work on a simple app called COVID-19 Self Checker Form which is a clinical multi-step assessment form that will assist individuals on deciding when to seek testing or medical care if they suspect they or someone they know has contracted COVID-19 or has come into close contact with someone who has COVID-19.
Without further ado, let’s commence.
Create a Form with Bootstrap 5
File Structure
Before we begin, let’s create the necessary files and folders. We need to create the following files and folders following this composition:
root/
|—css/
|——style.css
|—images/
|—js/
|——script.js
|—index.html
Downloading Bootstrap’s Source File
Next, we need to download the Bootstrap CSS source file and add it to our CSS folder. To do this, go to the Bootstrap 5 download page and download the source files. Inside the download source files, we need to copy the bootstrap.min.css file to our CSS folder. We don’t need the bootstrap bundle JavaScript file on this tutorial since we’re going to write our own JavaScript code to make the multi-form app that we’re going to build functional.
Images
I’ve already set up all the images that we need for this tutorial. You can download them here and place these images inside the images theme folder.

Basic markup
After downloading all of the necessary files, it’s now time to set up the basic starter html codes along with the links to our CSS and JavaScript files along with the link to Google font that we’re going to use. Inside the index.html file, we need to add the following codes:
Bootstrap 5: COVID-19 Self Checker Multi-step Form
Container and Two Columns
Now, I don’t want to strafe you with too much information so let’s take it to step by step. Let’s set up a basic container and two-column layout that we need for this tutorial. The left column will hold our titles and descriptions and the right column will hold our form.
Basically, we’ll have a container class that is set to display as a flexbox and position all contents in the middle of the screen using flexbox utilities and spacing utilities.
Title and Description Column
Next, inside the left column, we will set up a A clinical assessment multi-step form that will assist individuals on deciding when to seek testing or medical care if they suspect they or someone they know has contracted COVID-19 or has come into close contact with someone who has COVID-19 In the right column, we will add a bootstrap progress bar component at the very top, followed by a Now, let’s work on the markup of each step. First, we need to create a container We will have at least six steps in this tutorial with one Next, let’s add a preloader. We intentionally put this at the very bottom of our markup (outside the bootstrap container) since we’re not going to load this each time we load the page but only when the submit button is clicked. The preloader markup is very straightforward. We have a wrapper <div> with an id of #preloader-wrapper and we have the actual preloader that is place inside the following After adding all of our markups, the multi-step form app will look like a mess since there are no styles added yet. We will put some CSS styles inside our style.css on the next part of the tutorial to make it look nice. To bring the design of our multi-step form to life, we will now be adding our CSS for each column inside our style.css file. Before we move any further, we need to add our general CSS styles. These are CSS styles that will simply format our basic markup such as the font that we’re going to use throughout our multi-step form, the background and the basic styles of the standard HTML tags e.g. header tags, paragraph and label. Next, let’s work on the left column which contains our image, title and description. We will add styles on our #title-container id along with the associated HTML tags inside it and make sure that everything has the right styles including fonts, background-color and spacing. Now for the multi-steps column, we need to add CSS styles to our #qbox-container id followed by the #step-container id which will hold our step forms and its contents. We will give containers a nice background pattern image and position it along with a proper width flexbox alignment and box-shadow to create a shadow effect. We should be hiding our steps and it’s inside element at first since we’re going to manipulate what to display on the screen later using our custom JavaScript code. Finally, we will also add some CSS styles for our checkbox, radio buttons, inputs and buttons including their focus state to create a nice selection effect instead of relying on the typical bootstrap custom styles. We also need to add some style for our preloader. This will only load once the submit button is clicked at the end of the multi-step form. We will first define a width and height for our #preloader-wrapper id followed by the preloader itself via the #preloader id. We will also provide a nice spinning effect using CSS animation. We will specify the right keyframes for the animation using rotate property. Keyframes hold the styles of the preloader at certain duration times. Finally, we’ll add a nice transition for our left and right window that will split in the middle of the screen using our #preloader-wrapper id, .preloader-section and .section-left class for the left window and then #preloader-wrapper id, .preloader-section and .section-right class for the right window. The .loaded class will be added to the body class once the animation is finally done using our custom JavaScript code. Finally, we’re going to add some media queries to allow our content rendering to adapt to different screen resolutions or viewport widths as it resizes or viewed in a particular device. We will particularly manage the content rendering adaptation on different screen resolutions or viewport on our #title-container, #qbox-container and #steps-container ids’. At this point, the multi-step form app should be looking good, but you will see that the form screen with the form fields on it is currently blank by default since the steps are set to be hidden on our CSS styles. However, you can see that three buttons are all displayed at the bottom which should not be the case. We need to manage the display of each step using JavaScript. Now it’s time to put some magic on our multi-step form by putting some JavaScript code inside our script.js file. First, we will start by selecting HTML specific tags that we need via live node list using different document method such as document.getElementById, document.getElementsByClassName, document.getElementsByTagName and document.querySelector. All of these interface methods inherits from the Node and EventTarget interfaces. To be precise, we will capture the following elements: Next, let’s prevent the form submission by default and then set up variables for the current_step (the current We will add the bootstrap display property class .d-block to display the current step that needs to be filled up. On the first step, only the next button should be displayed via .d-inline-block display property class. Before we discuss the three major button events, let me first introduce you to the progress function which will power up the bootstrap progress bar markup that we set up inside the right column markup. This function will simply select the bootstrap progress bar from the document and provide the specific width to display in the progress bar as each step advances using the value argument that will be passed along inside the previous and next button. Next, let’s add an addEventListener() method to each of the buttons: previous, next and submit. This will set up a function that will be called whenever the ‘click’ event is triggered. The idea for the next button and previous button is almost similar but opposite. On the next button, we will simply increment the steps and then constantly remove and add the .d-none and .d-block class progressively to the step containing We will also set up some if statements that will check whether the step is already at the maximum step count or simply on the last step as well as which button to show on a particular step. Additionally, we’re calling the progress function at the bottom of the next and previous button addEventListener() method and passing in the value of 100 divided by the stepCount and multiplied by the current step. In a nutshell, we’re just simply dividing 100% to pieces so we can only show the right amount of progress for a particular step count. Lastly, for the submit button addEventListener() method, we will simply display the preloader by adding the display property class of .d-block to the body element and then set up a timer that will add the class .loaded at the end of the timer which is a duration of three seconds. At the last part of the asynchronous operation of Promise, we will hide all buttons as well as the last step and display the Now our project is complete. You can now navigate through the COVID-19 self-checker multi-step form that we created. You can check the demo here. Note: This is just one way to do this in JavaScript. There are numerous ways to create the same functionality. Technically speaking, there are literally a vast number of programs that will implement a specific algorithm or functionality in every situation. Feel free to explore and modify the program. If you want to create clutter-free forms for your landing pages or websites that convert well, multi-page forms are the way to go. With bootstrap, it’s easy to create forms and use other components in order to achieve this. By using JavaScript along with the available bootstrap components, you can quickly break down form questions and group them into specific topics to help users focus and likely complete your form.

COVID-19
Self Checker Form
Multi-step Form Column
Adding the Stylesheet
General CSS
/* GENERAL */

body {
    background: #f7f9ff;
    /* font-family: 'Josefin Sans', sans-serif; */
    font-family: 'Almarai', sans-serif !important;
    font-size: 16px;
    font-size: 1rem;
    font-weight: 600;
    line-height: 1.4;
    color: #555;
}

h1,
h2,
h3,
h4,
h5,
h6 {
    color: #00011c;
}

p {
    margin-bottom: 24px;
    line-height: 1.9;
}

label {
    font-size: 16px;
    font-size: 1rem;
    font-weight: 600;
    margin-bottom: 5px;
    color: #00011c;
}
Title and Description Column
/* TITLE */

#title-container {
    border-radius: 3rem 0px 0px 3rem;
    min-height: 460px;
    height: 100%;
    color: #fff;
    background-color: #7bdaff;
    text-align: center;
    padding: 105px 28px 28px 28px;
    box-sizing: border-box;
    position: relative;
    box-shadow: 10px 8px 21px 0px rgba(204, 204, 204, 0.75);
    -webkit-box-shadow: 10px 8px 21px 0px rgba(204, 204, 204, 0.75);
    -moz-box-shadow: 10px 8px 21px 0px rgba(204, 204, 204, 0.75);
}

#title-container h2 {
    font-size: 45px;
    font-weight: 800;
    color: #fff;
    padding: 0;
    margin-bottom: 0px;
}

#title-container h3 {
    font-size: 25px;
    font-weight: 600;
    color: #0084b5;
    padding: 0;
}

#title-container p {
    font-size: 13px;
    padding: 0 25px;
    line-height: 20px;
}

.covid-image {
    width: 214px;
    margin-bottom: 15px;
}
Multi-step Form Column
/* FORMS */

#qbox-container {
    border-radius: 0px 3rem 3rem 0px;
    background-color: white;
    background-repeat: repeat;
    position: relative;
    padding: 62px;
    min-height: 630px;
    box-shadow: 10px 8px 21px 0px rgba(204, 204, 204, 0.75);
    -webkit-box-shadow: 10px 8px 21px 0px rgba(204, 204, 204, 0.75);
    -moz-box-shadow: 10px 8px 21px 0px rgba(204, 204, 204, 0.75);
}

#steps-container {
    margin: auto;
    width: 500px;
    min-height: 420px;
    display: flex;
    vertical-align: middle;
    align-items: center;
}

.step {
    display: none;
}

.step h4 {
    margin: 0 0 26px 0;
    padding: 0;
    position: relative;
    font-weight: 500;
    font-size: 23px;
    font-size: 1.4375rem;
    line-height: 1.6;
}

button#submit-btn{

    background-color: #ffc800  !important;

}

button#submit-btn::after{

    background-color: #edb900 !important;


}

button#next-btn{
    background: #4ce98b !important;

}

button#next-btn::after{

    background: #38ca72 !important;
}

button#prev-btn,
button#next-btn,
button#submit-btn {
    font-size: 17px;
    font-weight: bold;
    position: relative;
    width: 130px;
    height: 50px;
    background: #ff5d6d;
    margin: 0 auto;
    margin-top: 40px;
    overflow: hidden;
    z-index: 1;
    cursor: pointer;
    transition: color .3s;
    text-align: center;
    color: #fff;
    border: 0;
    border-radius: 10px !important;
}

button#prev-btn:after,
button#next-btn:after,
button#submit-btn:after {
    position: absolute;
    top: 90%;
    left: 0;
    width: 100%;
    height: 100%;
    background: #fd293b;
    content: "";
    z-index: -2;
    transition: transform .3s;
}

button#prev-btn:hover::after,
button#next-btn:hover::after,
button#submit-btn:hover::after {
    transform: translateY(-80%);
    transition: transform .3s;
}

.progress {
    border-radius: 3rem !important;
    margin-bottom: 20px;
}

.bg-danger{
    background-color: #7bdaff !important;
    background-image: none;
    border-radius: 4rem;
}

.q__question {
    position: relative;
}

.q__question:not(:last-child) {
    margin-bottom: 10px;
}

.question__input {
    position: absolute;
    left: -9999px;
}

.question__label {
    position: relative;
    display: block;
    line-height: 40px;
    border: 1px solid #ced4da;
    border-radius: 25rem;
    background-color: #fff;
    padding: 5px 20px 5px 50px;
    cursor: pointer;
    transition: all 0.15s ease-in-out;
}

.question__label:hover {
    border-color: #56caf8;
}

.question__label:before,
.question__label:after {
    position: absolute;
    content: "";
}

.question__label:before {
    top: 12px;
    left: 10px;
    width: 26px;
    height: 26px;
    border-radius: 50%;
    background-color: #fff;
    box-shadow: inset 0 0 0 1px #ced4da;
    -webkit-transition: all 0.15s ease-in-out;
    -moz-transition: all 0.15s ease-in-out;
    -o-transition: all 0.15s ease-in-out;
    transition: all 0.15s ease-in-out;
}

.question__input:checked+.question__label:before {
    background-color: #7bdaff;
    box-shadow: 0 0 0 0;
}

.question__input:checked+.question__label:after {
    top: 22px;
    left: 18px;
    width: 10px;
    height: 5px;
    border-left: 2px solid #fff;
    border-bottom: 2px solid #fff;
    transform: rotate(-45deg);
}

.form-check-input:checked,
.form-check-input:focus {
    background-color: #56caf8 !important;
    outline: none !important;
    border: none !important;
}

input:focus {
    outline: none;
}

#input-container {
    display: inline-block;
    box-shadow: none !important;
    margin-top: 36px !important;
}

label.form-check-label.radio-lb {
    margin-right: 15px;
}

#q-box__buttons {
    text-align: center;
}

input[type="text"],
input[type="email"] {
    padding: 8px 14px;
    border-radius: 25rem;
}

input[type="text"]:focus,
input[type="email"]:focus {
    border: 1px solid #56caf8;
    border-radius: 25rem;
    outline: 0px !important;
    -webkit-appearance: none;
    box-shadow: none !important;
    -webkit-transition: all 0.15s ease-in-out;
    -moz-transition: all 0.15s ease-in-out;
    -o-transition: all 0.15s ease-in-out;
    transition: all 0.15s ease-in-out;
}

.form-check-input:checked[type=radio],
.form-check-input:checked[type=radio]:hover,
.form-check-input:checked[type=radio]:focus,
.form-check-input:checked[type=radio]:active {
    border: none !important;
    -webkit-outline: 0px !important;
    box-shadow: none !important;
}

.form-check-input:focus,
input[type="radio"]:hover {
    box-shadow: none;
    cursor: pointer !important;
}

#success {
    display: none;
}

#success h4 {
    color: #0084b5;
}

.back-link {
    font-weight: 700;
    color: #0084b5;
    text-decoration: none;
    font-size: 18px;
}

.back-link:hover {
    color: #00739c;
}
Preloader
/* PRELOADER */

#preloader-wrapper {
    width: 100%;
    height: 100%;
    z-index: 1000;
    display: none;
    position: fixed;
    top: 0;
    left: 0;
}

#preloader {
    background-image: url('../images/preloader.png');
    width: 120px;
    height: 119px;
    border-top-color: #fff;
    border-radius: 100%;
    display: block;
    position: relative;
    top: 50%;
    left: 50%;
    margin: -75px 0 0 -75px;
    -webkit-animation: spin 2s linear infinite;
    animation: spin 2s linear infinite;
    z-index: 1001;
}

@-webkit-keyframes spin {
    0% {
        -webkit-transform: rotate(0deg);
        -ms-transform: rotate(0deg);
        transform: rotate(0deg);
    }
    100% {
        -webkit-transform: rotate(360deg);
        -ms-transform: rotate(360deg);
        transform: rotate(360deg);
    }
}

@keyframes spin {
    0% {
        -webkit-transform: rotate(0deg);
        -ms-transform: rotate(0deg);
        transform: rotate(0deg);
    }
    100% {
        -webkit-transform: rotate(360deg);
        -ms-transform: rotate(360deg);
        transform: rotate(360deg);
    }
}

#preloader-wrapper .preloader-section {
    width: 51%;
    height: 100%;
    position: fixed;
    top: 0;
    background: #F7F9FF;
    z-index: 1000;
}

#preloader-wrapper .preloader-section.section-left {
    left: 0
}

#preloader-wrapper .preloader-section.section-right {
    right: 0;
}

.loaded #preloader-wrapper .preloader-section.section-left {
    transform: translateX(-100%);
    transition: all 0.7s 0.3s cubic-bezier(0.645, 0.045, 0.355, 1.000);
}

.loaded #preloader-wrapper .preloader-section.section-right {
    transform: translateX(100%);
    transition: all 0.7s 0.3s cubic-bezier(0.645, 0.045, 0.355, 1.000);
}

.loaded #preloader {
    opacity: 0;
    transition: all 0.3s ease-out;
}

.loaded #preloader-wrapper {
    visibility: hidden;
    transform: translateY(-100%);
    transition: all 0.3s 1s ease-out;
}
Responsive CSS
/* MEDIA QUERIES */

@media (min-width: 990px) and (max-width: 1199px) {
    #title-container {
        padding: 80px 28px 28px 28px;
    }
    #steps-container {
        width: 85%;
    }
}

@media (max-width: 991px) {
    #title-container {
        padding: 30px;
        min-height: inherit;
    }
}

@media (max-width: 767px) {
    #qbox-container {
        padding: 30px;
    }
    #steps-container {
        width: 100%;
        min-height: 400px;
    }
    #title-container {
        padding-top: 50px;
    }
}

@media (max-width: 560px) {
    #qbox-container {
        padding: 40px;
    }
    #title-container {
        padding-top: 45px;
    }
}
Adding JavaScript codes
let step = document.getElementsByClassName('step');
let prevBtn = document.getElementById('prev-btn');
let nextBtn = document.getElementById('next-btn');
let submitBtn = document.getElementById('submit-btn');
let form = document.getElementsByTagName('form')[0];
let preloader = document.getElementById('preloader-wrapper');
let bodyElement = document.querySelector('body');
let succcessDiv = document.getElementById('success');
form.onsubmit = () => {
    return false
}
let current_step = 0;
let stepCount = 6
step[current_step].classList.add('d-block');
if (current_step == 0) {
    prevBtn.classList.add('d-none');
    submitBtn.classList.add('d-none');
    nextBtn.classList.add('d-inline-block');
}
const progress = (value) => {
    document.getElementsByClassName('progress-bar')[0].style.width = `${value}%`;
}
nextBtn.addEventListener('click', () => {
    current_step++;
    let previous_step = current_step - 1;
    if ((current_step > 0) && (current_step <= stepCount)) {
        prevBtn.classList.remove('d-none');
        prevBtn.classList.add('d-inline-block');
        step[current_step].classList.remove('d-none');
        step[current_step].classList.add('d-block');
        step[previous_step].classList.remove('d-block');
        step[previous_step].classList.add('d-none');
        if (current_step == stepCount) {
            submitBtn.classList.remove('d-none');
            submitBtn.classList.add('d-inline-block');
            nextBtn.classList.remove('d-inline-block');
            nextBtn.classList.add('d-none');
        }
    } else {
        if (current_step > stepCount) {
            form.onsubmit = () => {
                return true
            }
        }
    }
    progress((100 / stepCount) * current_step);
});


prevBtn.addEventListener('click', () => {
    if (current_step > 0) {
        current_step--;
        let previous_step = current_step + 1;
        prevBtn.classList.add('d-none');
        prevBtn.classList.add('d-inline-block');
        step[current_step].classList.remove('d-none');
        step[current_step].classList.add('d-block')
        step[previous_step].classList.remove('d-block');
        step[previous_step].classList.add('d-none');
        if (current_step < stepCount) {
            submitBtn.classList.remove('d-inline-block');
            submitBtn.classList.add('d-none');
            nextBtn.classList.remove('d-none');
            nextBtn.classList.add('d-inline-block');
            prevBtn.classList.remove('d-none');
            prevBtn.classList.add('d-inline-block');
        }
    }

    if (current_step == 0) {
        prevBtn.classList.remove('d-inline-block');
        prevBtn.classList.add('d-none');
    }
    progress((100 / stepCount) * current_step);
});


submitBtn.addEventListener('click', () => {
    preloader.classList.add('d-block');

    const timer = ms => new Promise(res => setTimeout(res, ms));

    timer(3000)
        .then(() => {
            bodyElement.classList.add('loaded');
        }).then(() => {
            step[stepCount].classList.remove('d-block');
            step[stepCount].classList.add('d-none');
            prevBtn.classList.remove('d-inline-block');
            prevBtn.classList.add('d-none');
            submitBtn.classList.remove('d-inline-block');
            submitBtn.classList.add('d-none');
            succcessDiv.classList.remove('d-none');
            succcessDiv.classList.add('d-block');
        })

});

Conclusion
Comments